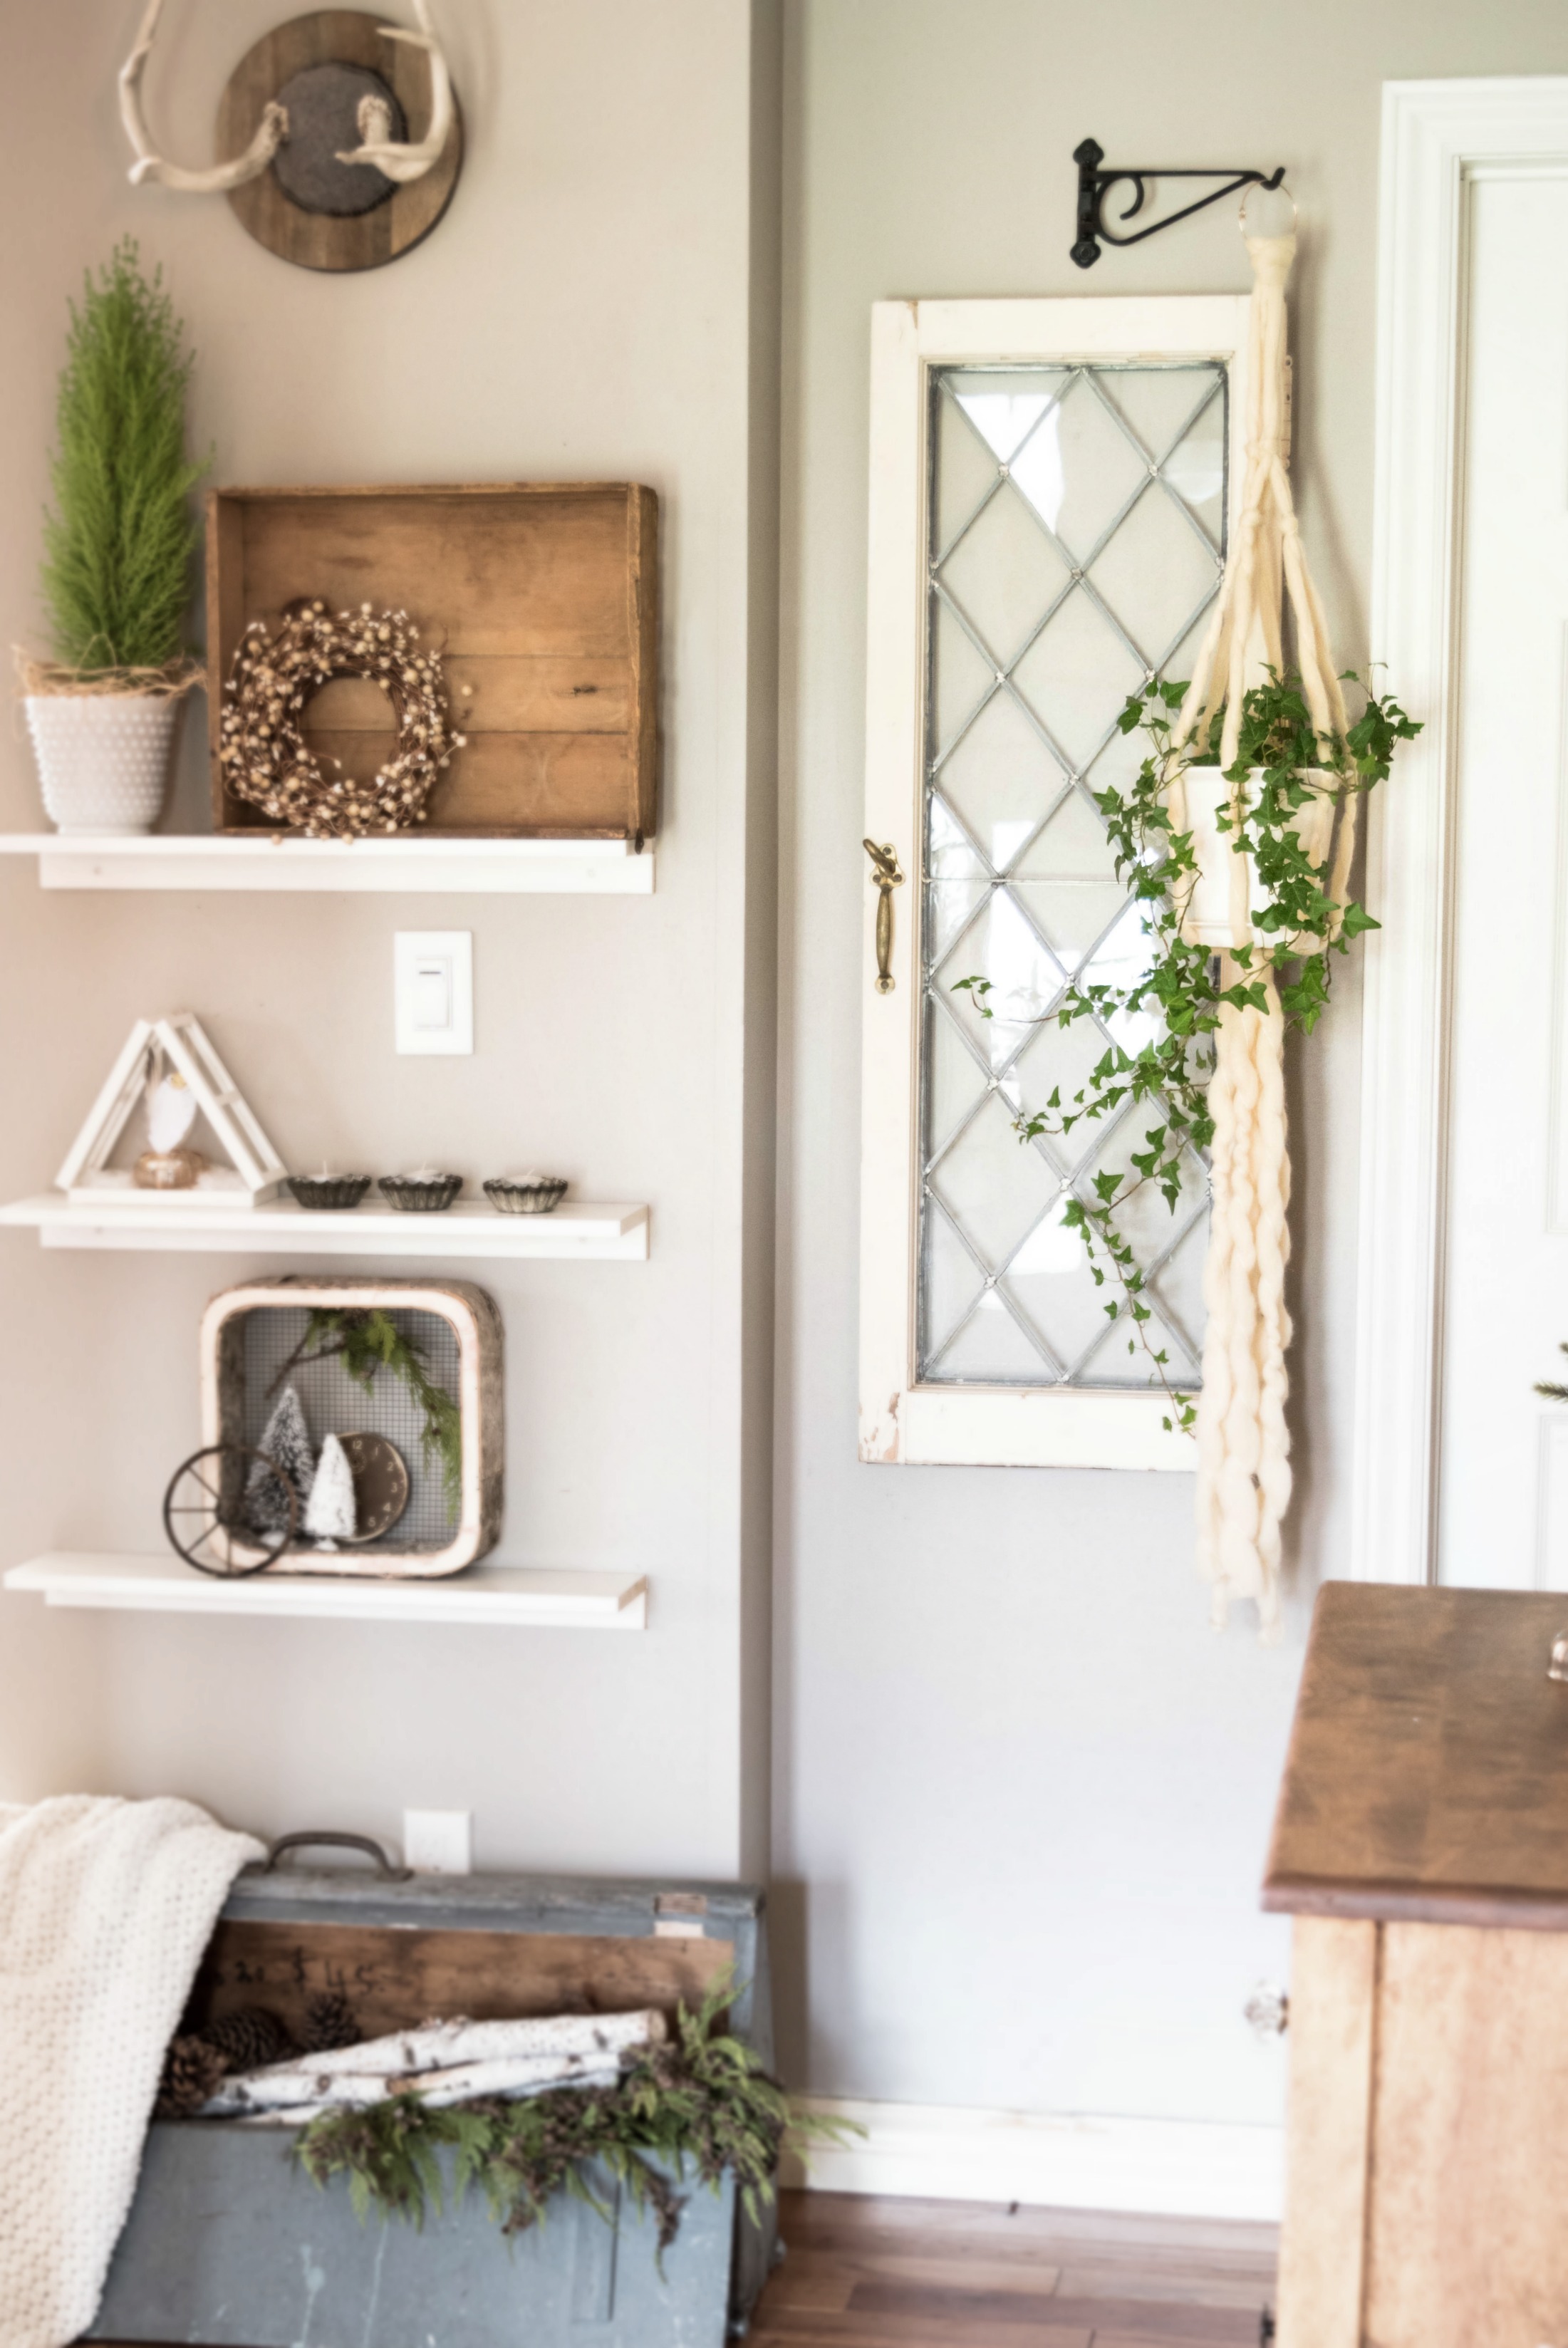
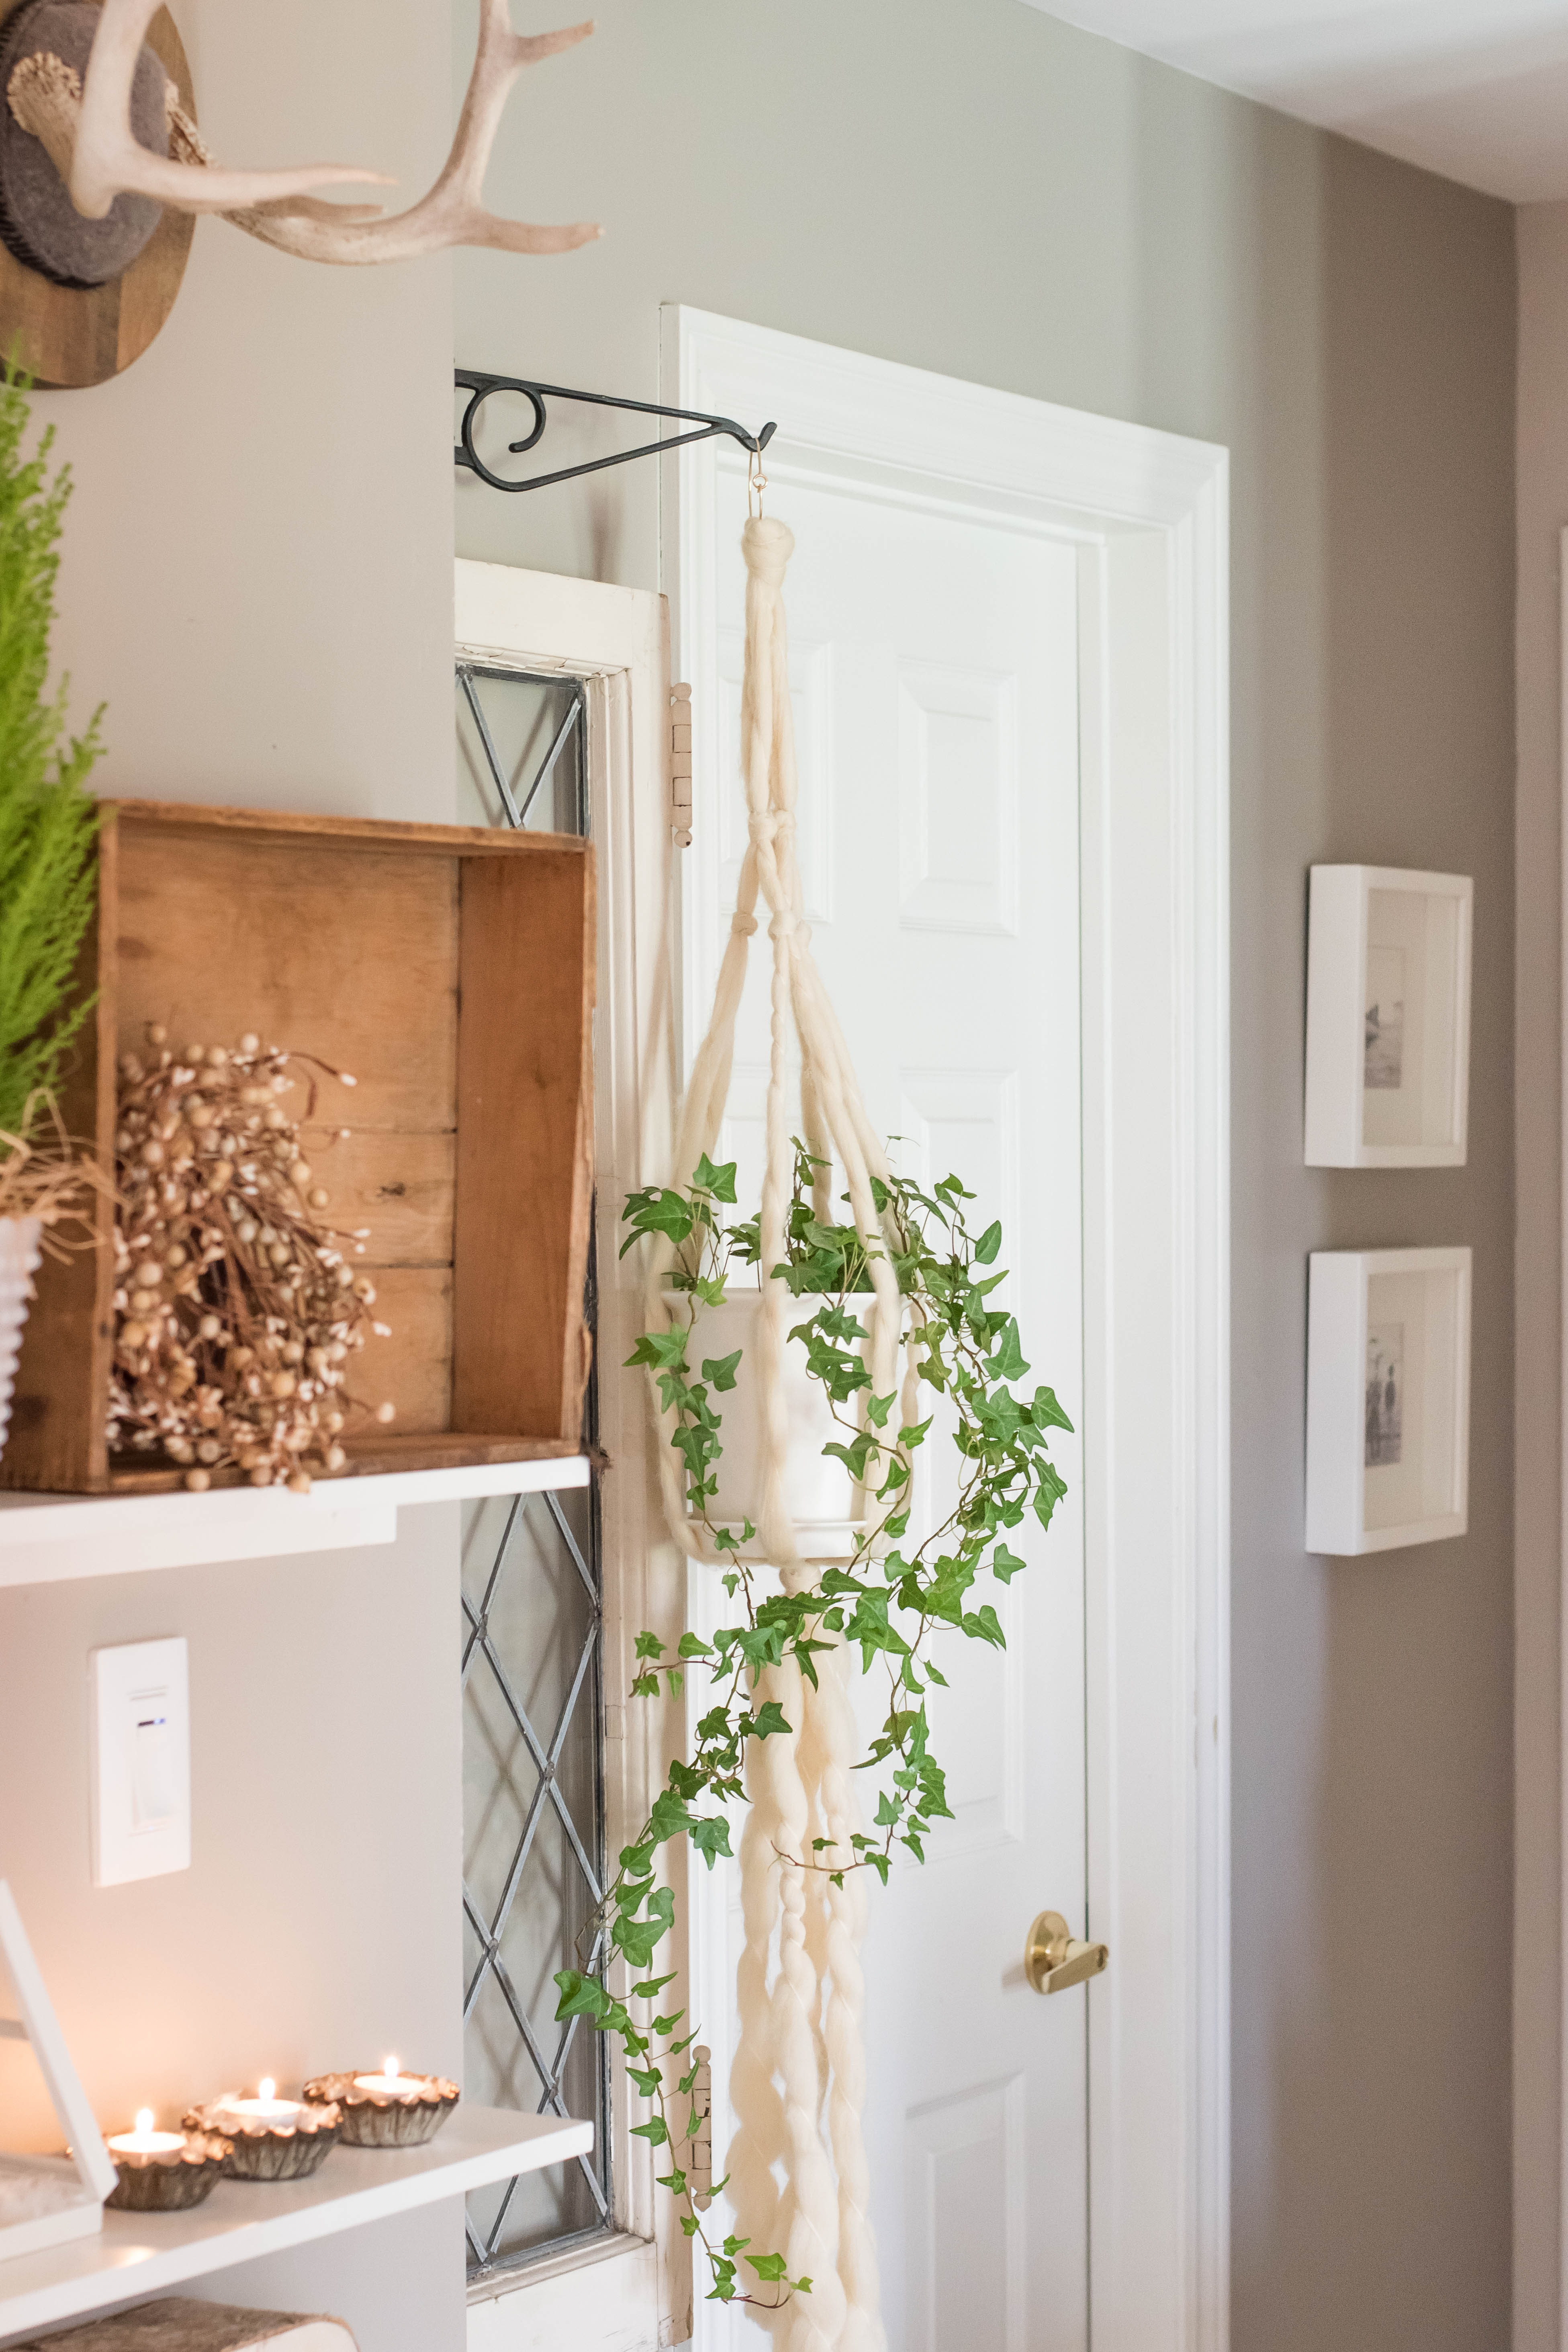
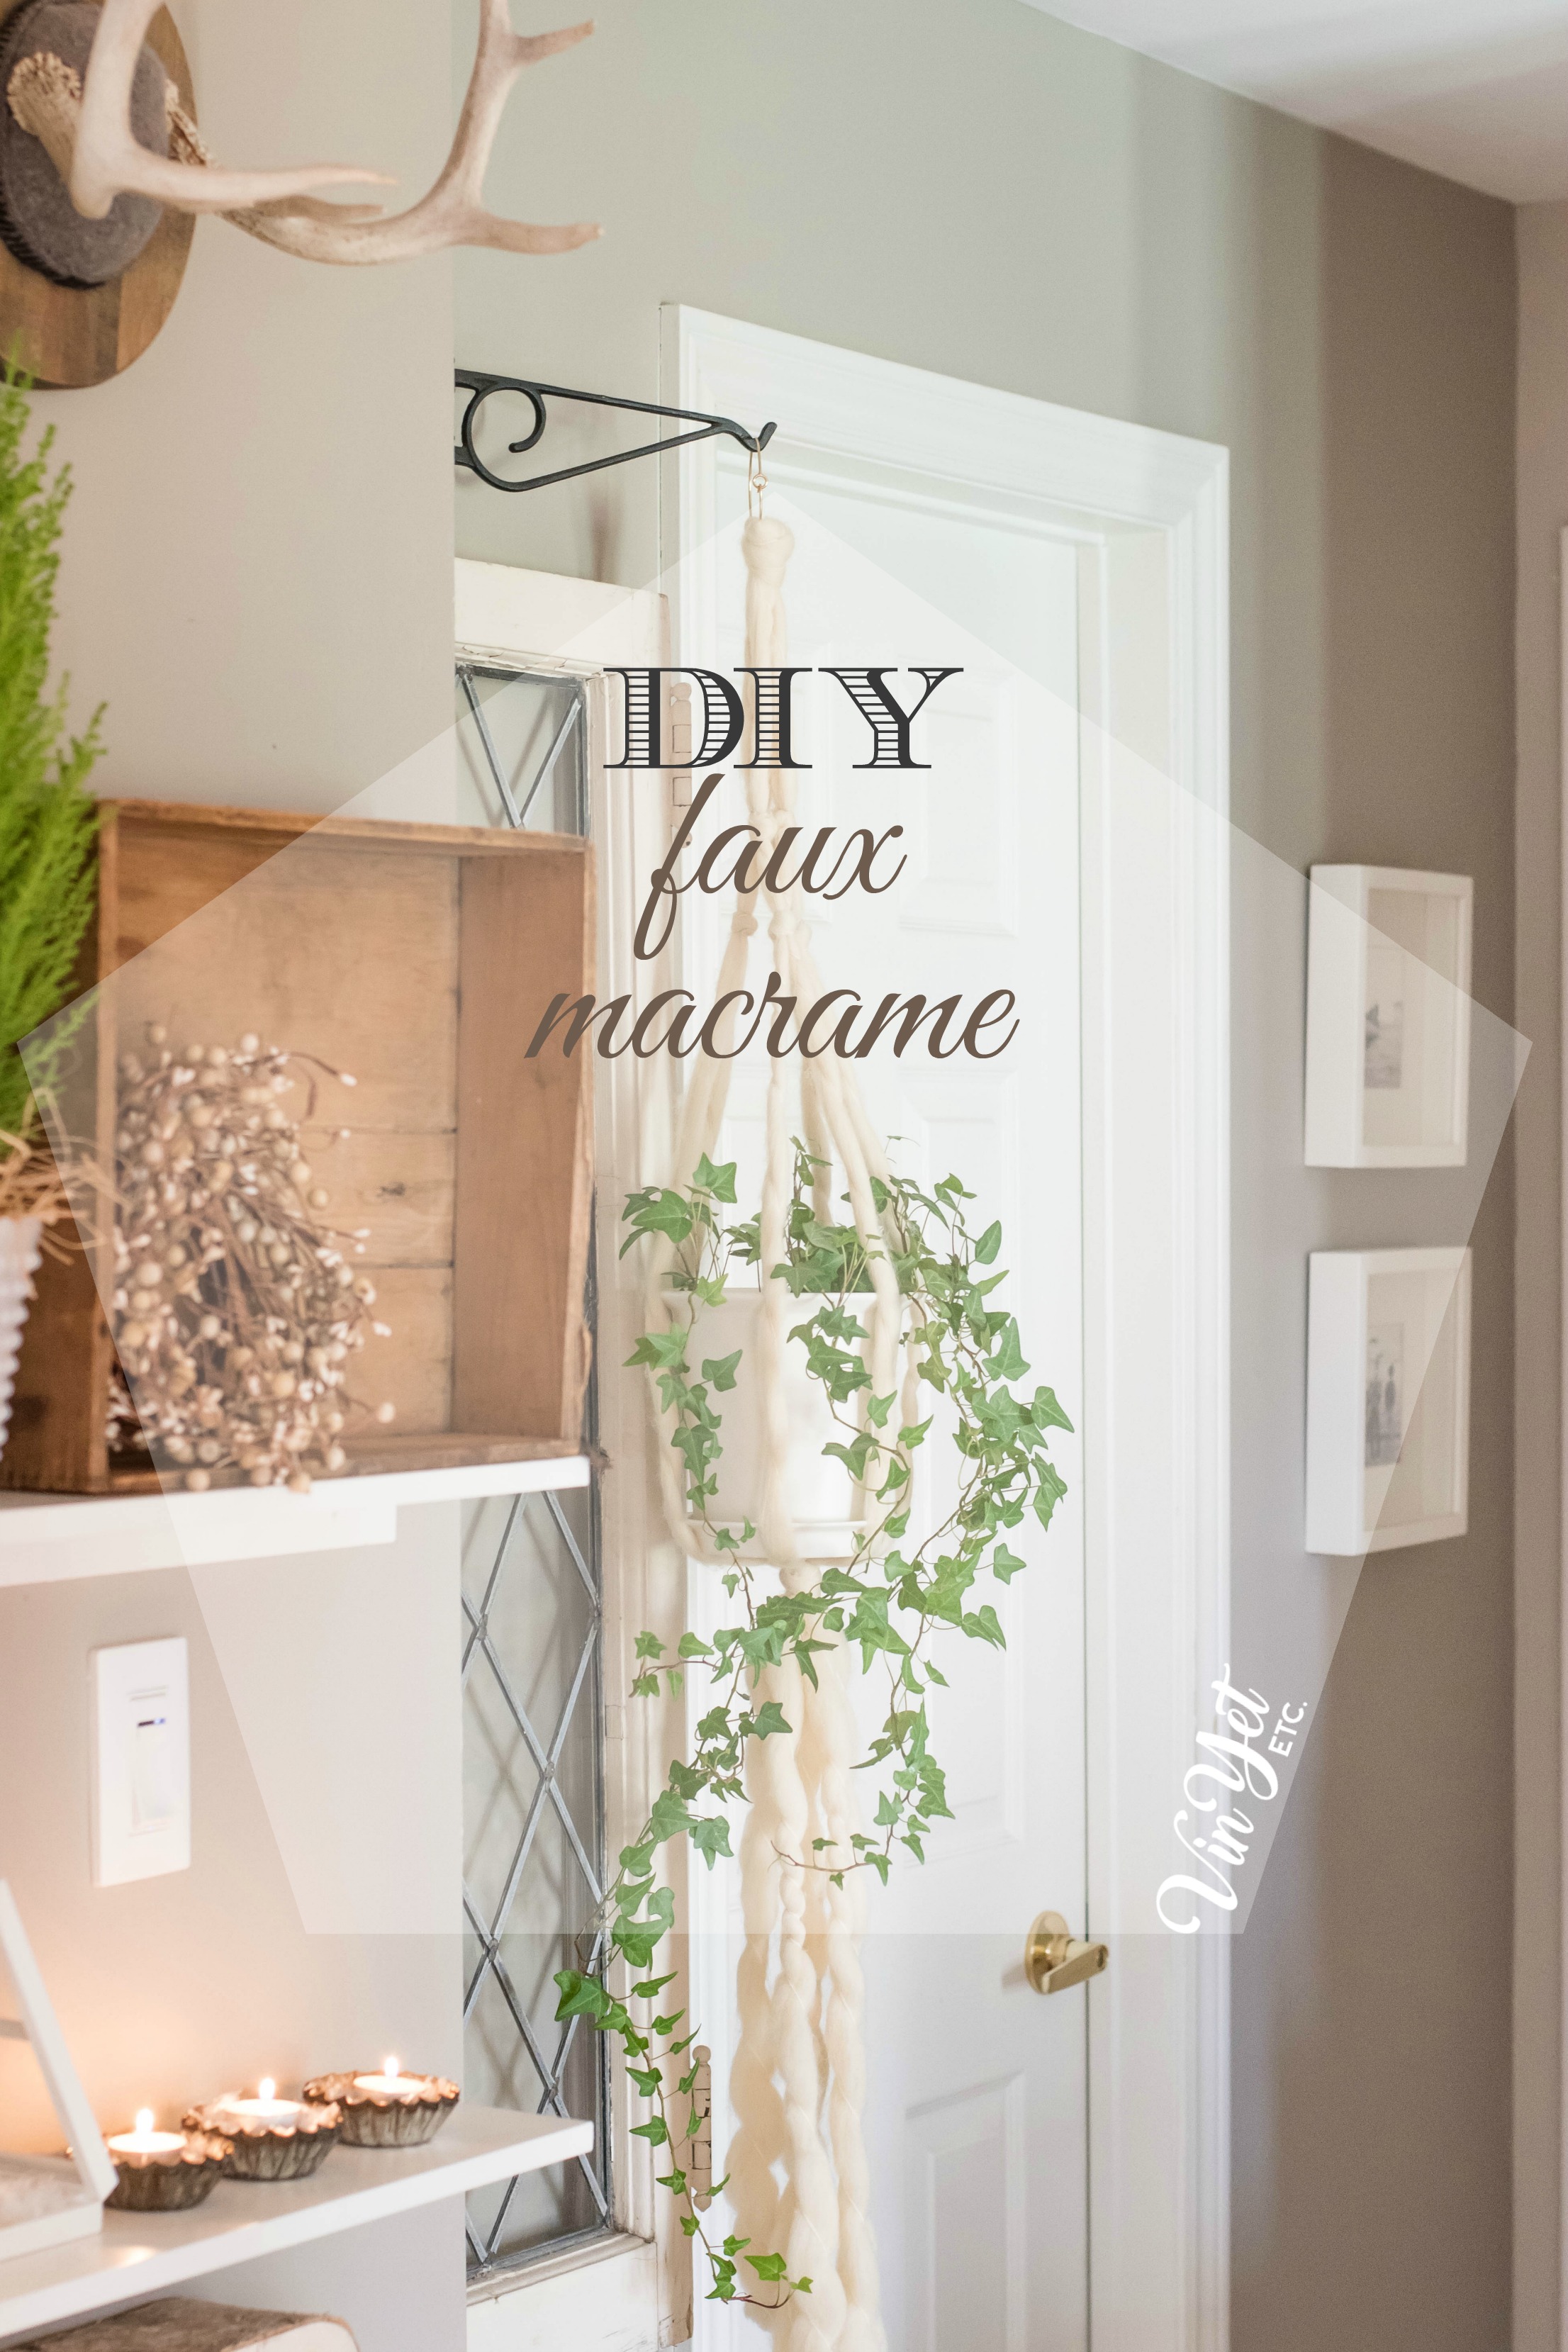
Hi guys… don’t faint… two posts in one day!!! HAHA I’m just as surprised as you are – don’t worry. In case you aren’t sure what the heck I’m talking about, this morning my Canadian Christmas home tour went live, you can check out the whole tour here, this easy DIY faux macrame hanger has a small cameo… how’s that for a segue into this post?
December’s #12MonthsOfDIY
This post is our last project for 2016’s 12MonthsOfDIY… I just can’t believe it! What an incredibly fast year that was. I have met so many wonderful new friends and have completely stepped out of my comfort zone by challenging myself every month with a new material. It’s been a very good way to exercise that creative muscle! I’ve done some projects that I am very proud of and I’ve had so much fun too. I sure hope you’ve had fun seeing all of the creative stuff the 12 of us have made? You can follow along with all of the 12 Month’s projects on Instagram, just follow the hashtag – #12MonthsOfDIY and explore, these ladies blow me away!
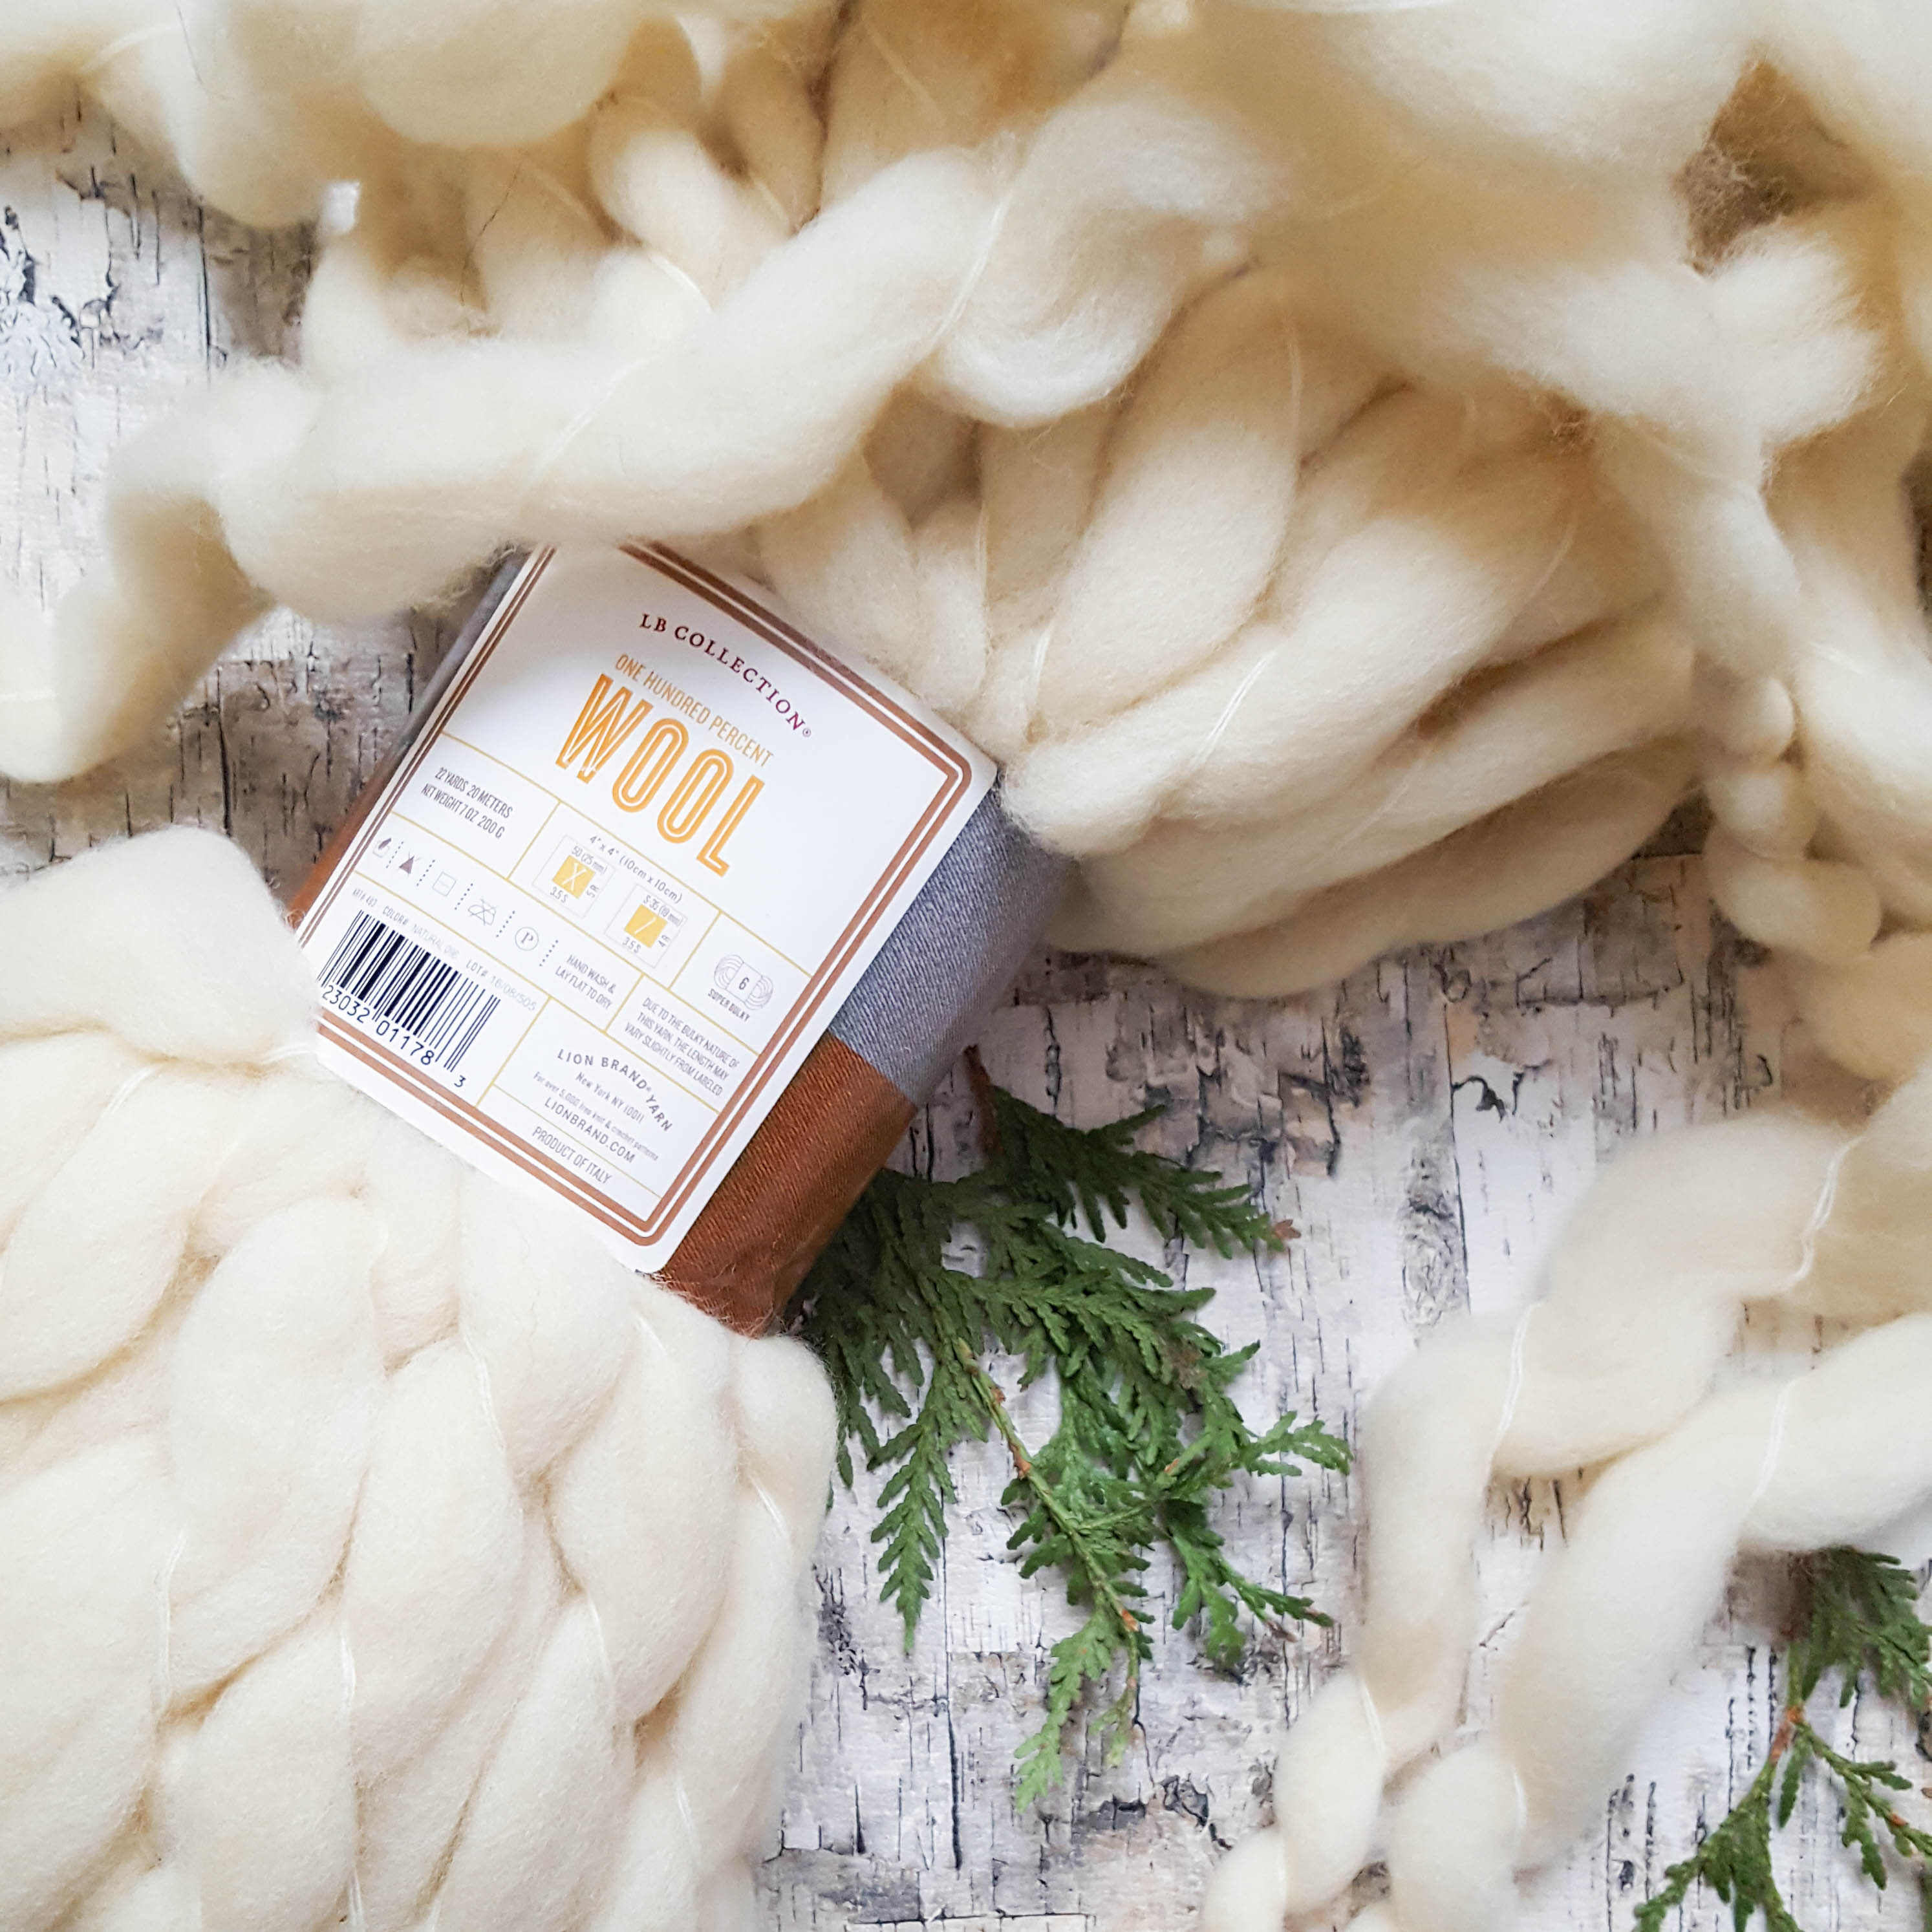
The last material for 12MonthsOfDIY is yarn – and oh my goodness the yarn I picked from Lion Brand® Yarn Company is so luxurious! They are very generously sponsoring this month’s project and I am in LOVE! What I had in mind when I picked this particular yarn was an arm knit a blanket… at least that was the plan. But as soon as I opened the package I knew I had to save this wool for something special, not that arm knitting isn’t special because it is and I love those blankets, a lot… I just wanted to take my time and make something I know I would use for more than a throw blanket (because I have a bazillion) for display. So what I’ve done is I’ve tucked all of it away for a future project, all of it except for some pieces, and these are the pieces I used to make this simple DIY faux macrame hanger.
DIY faux macrame hanger – how to
This will be the easiest tutorial EVER! I absolutely love how this faux macrame hanger turned out, the texture, the look and feel of this hanger is exactly what I wanted and if you like it too this is how I made it.
Things you will need:
- Thick plush wool (this is what I ordered exactly)
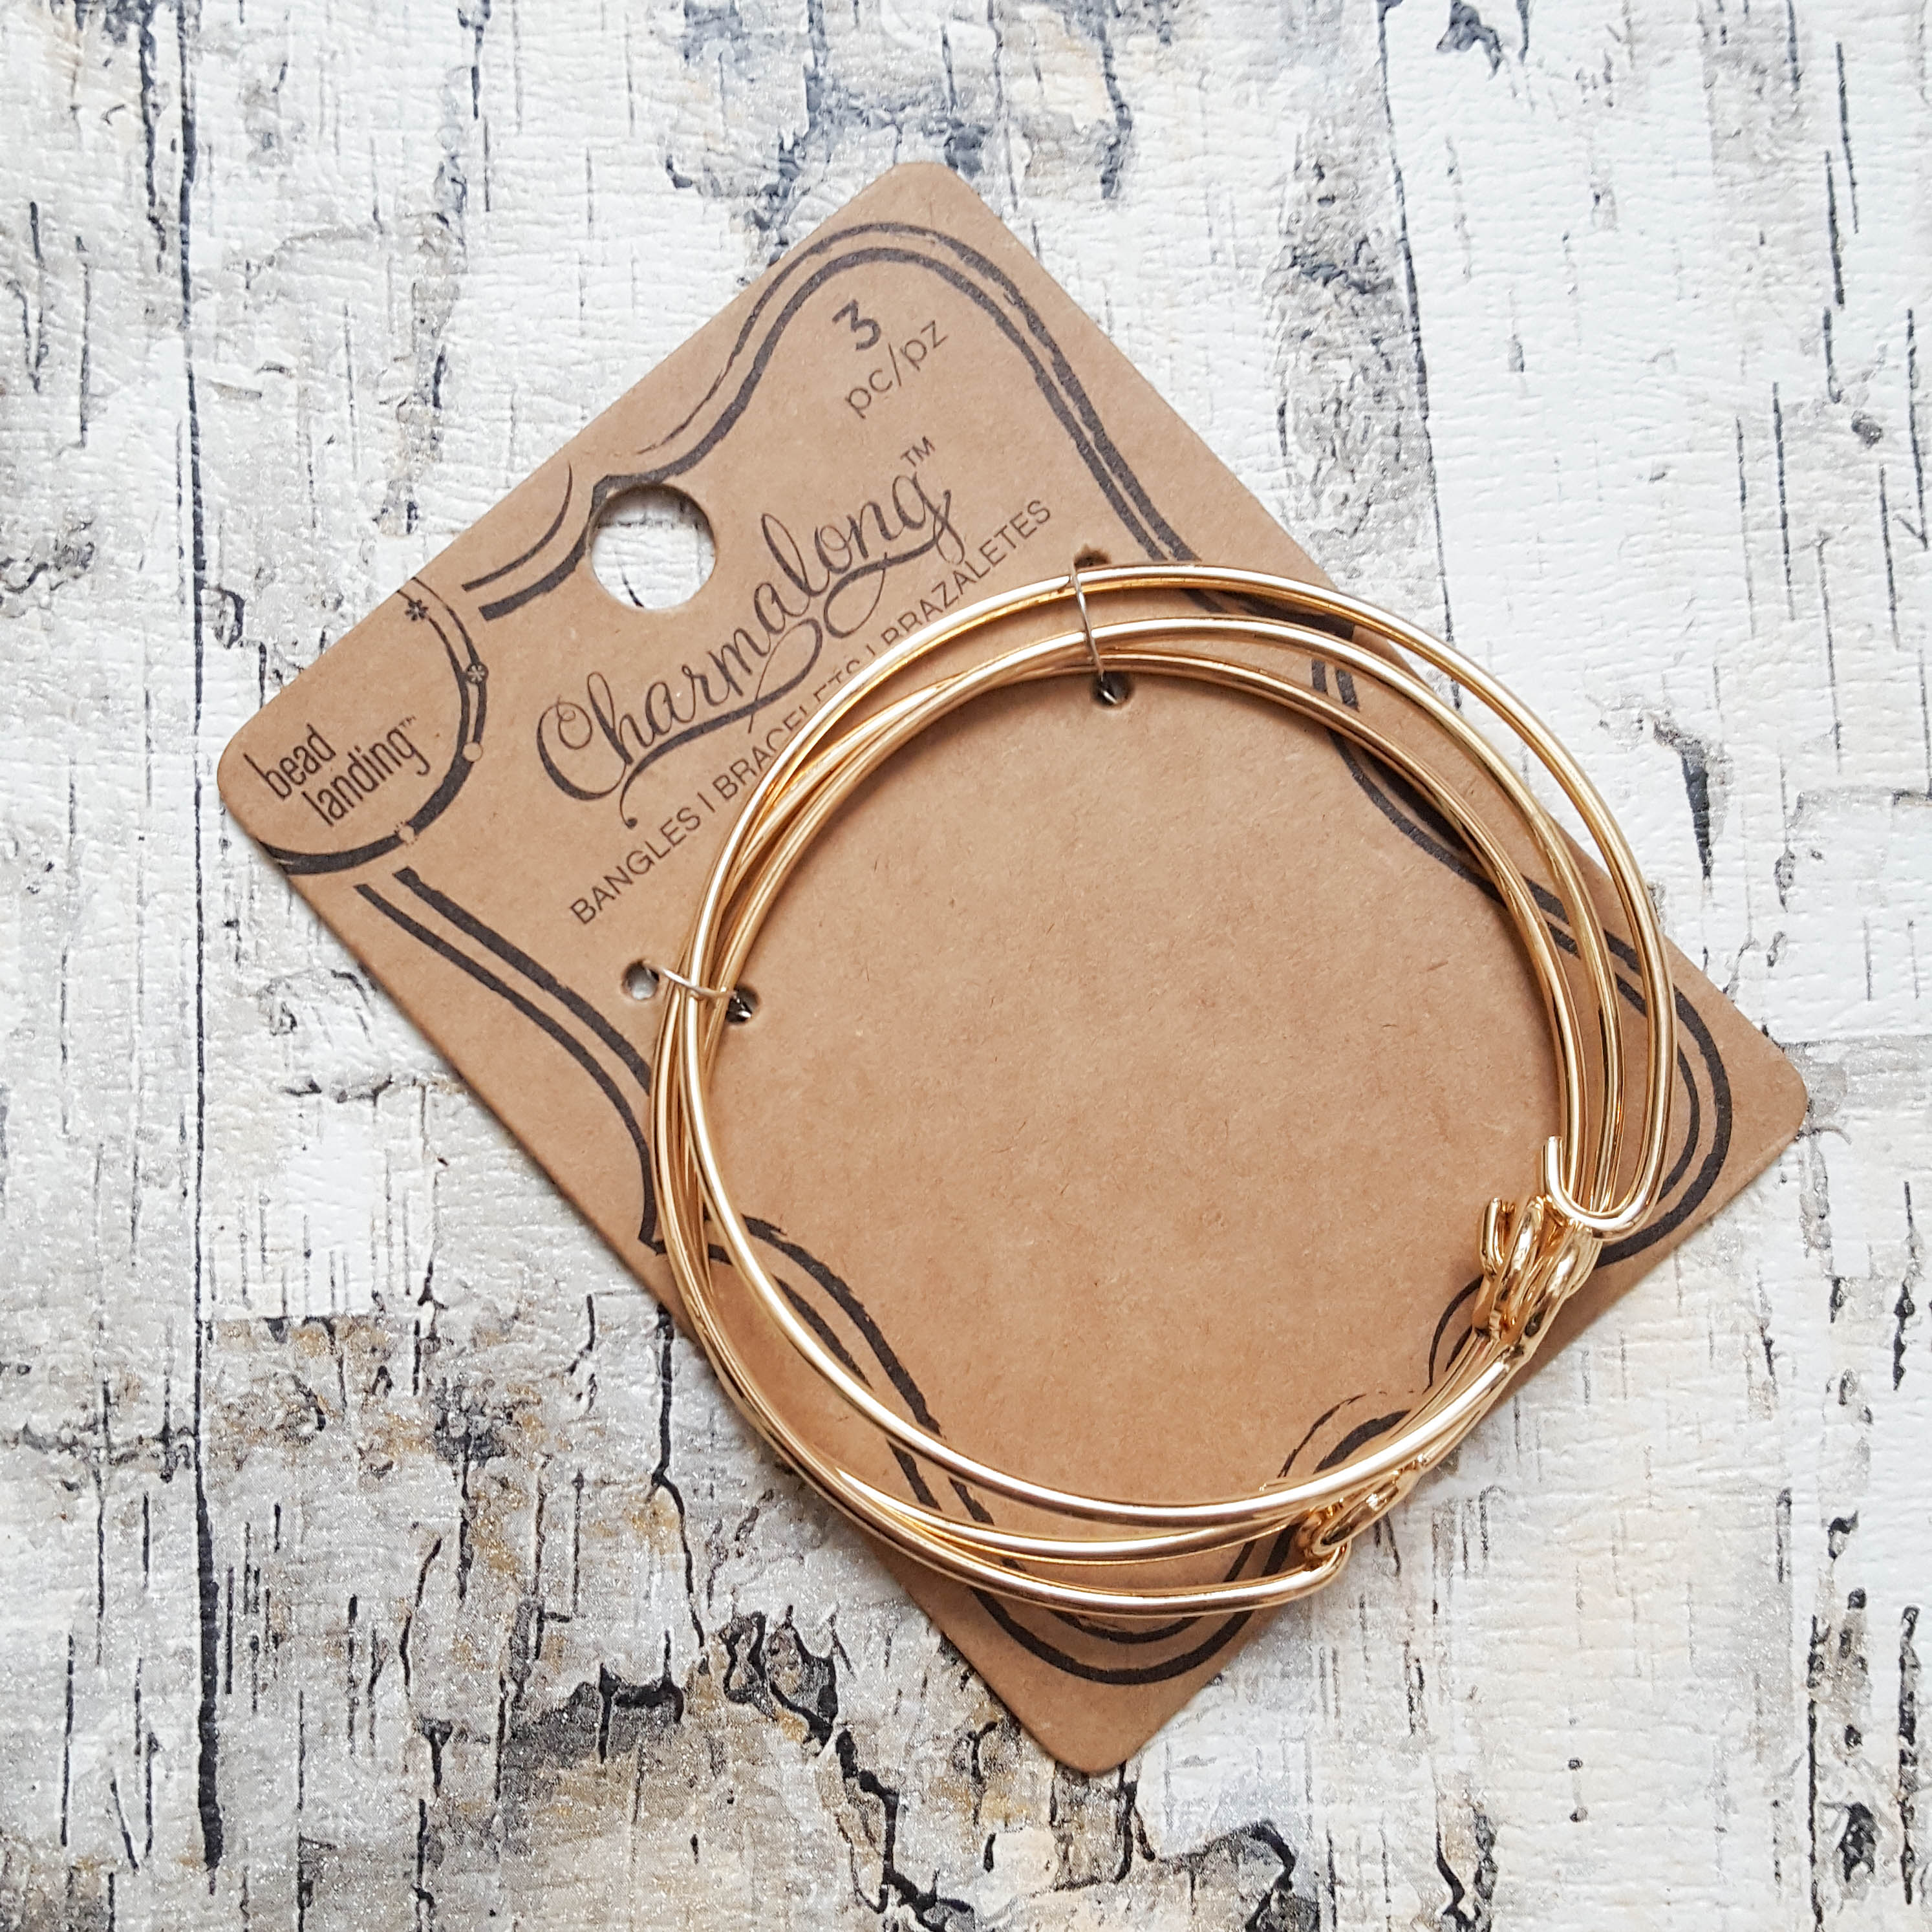
- 1 Pkg of child sized gold bangle bracelets (you can go bigger if you’d like – decide this to your tastes) – these came in a pkg of 3 from Michael’s, make sure that there is a strong clasp or a hook with an eyelet (like I bought) ensure this will hold a good amount of weight, I felt these were safe because of the hook and eyelet – I made sure the hook pointed down when I strung the yarn onto the bangle.
- Scissors
- Same coloured twine or string, same colour as your yarn – don’t worry if it’s not an exact match… I will tell you why in the instructions.
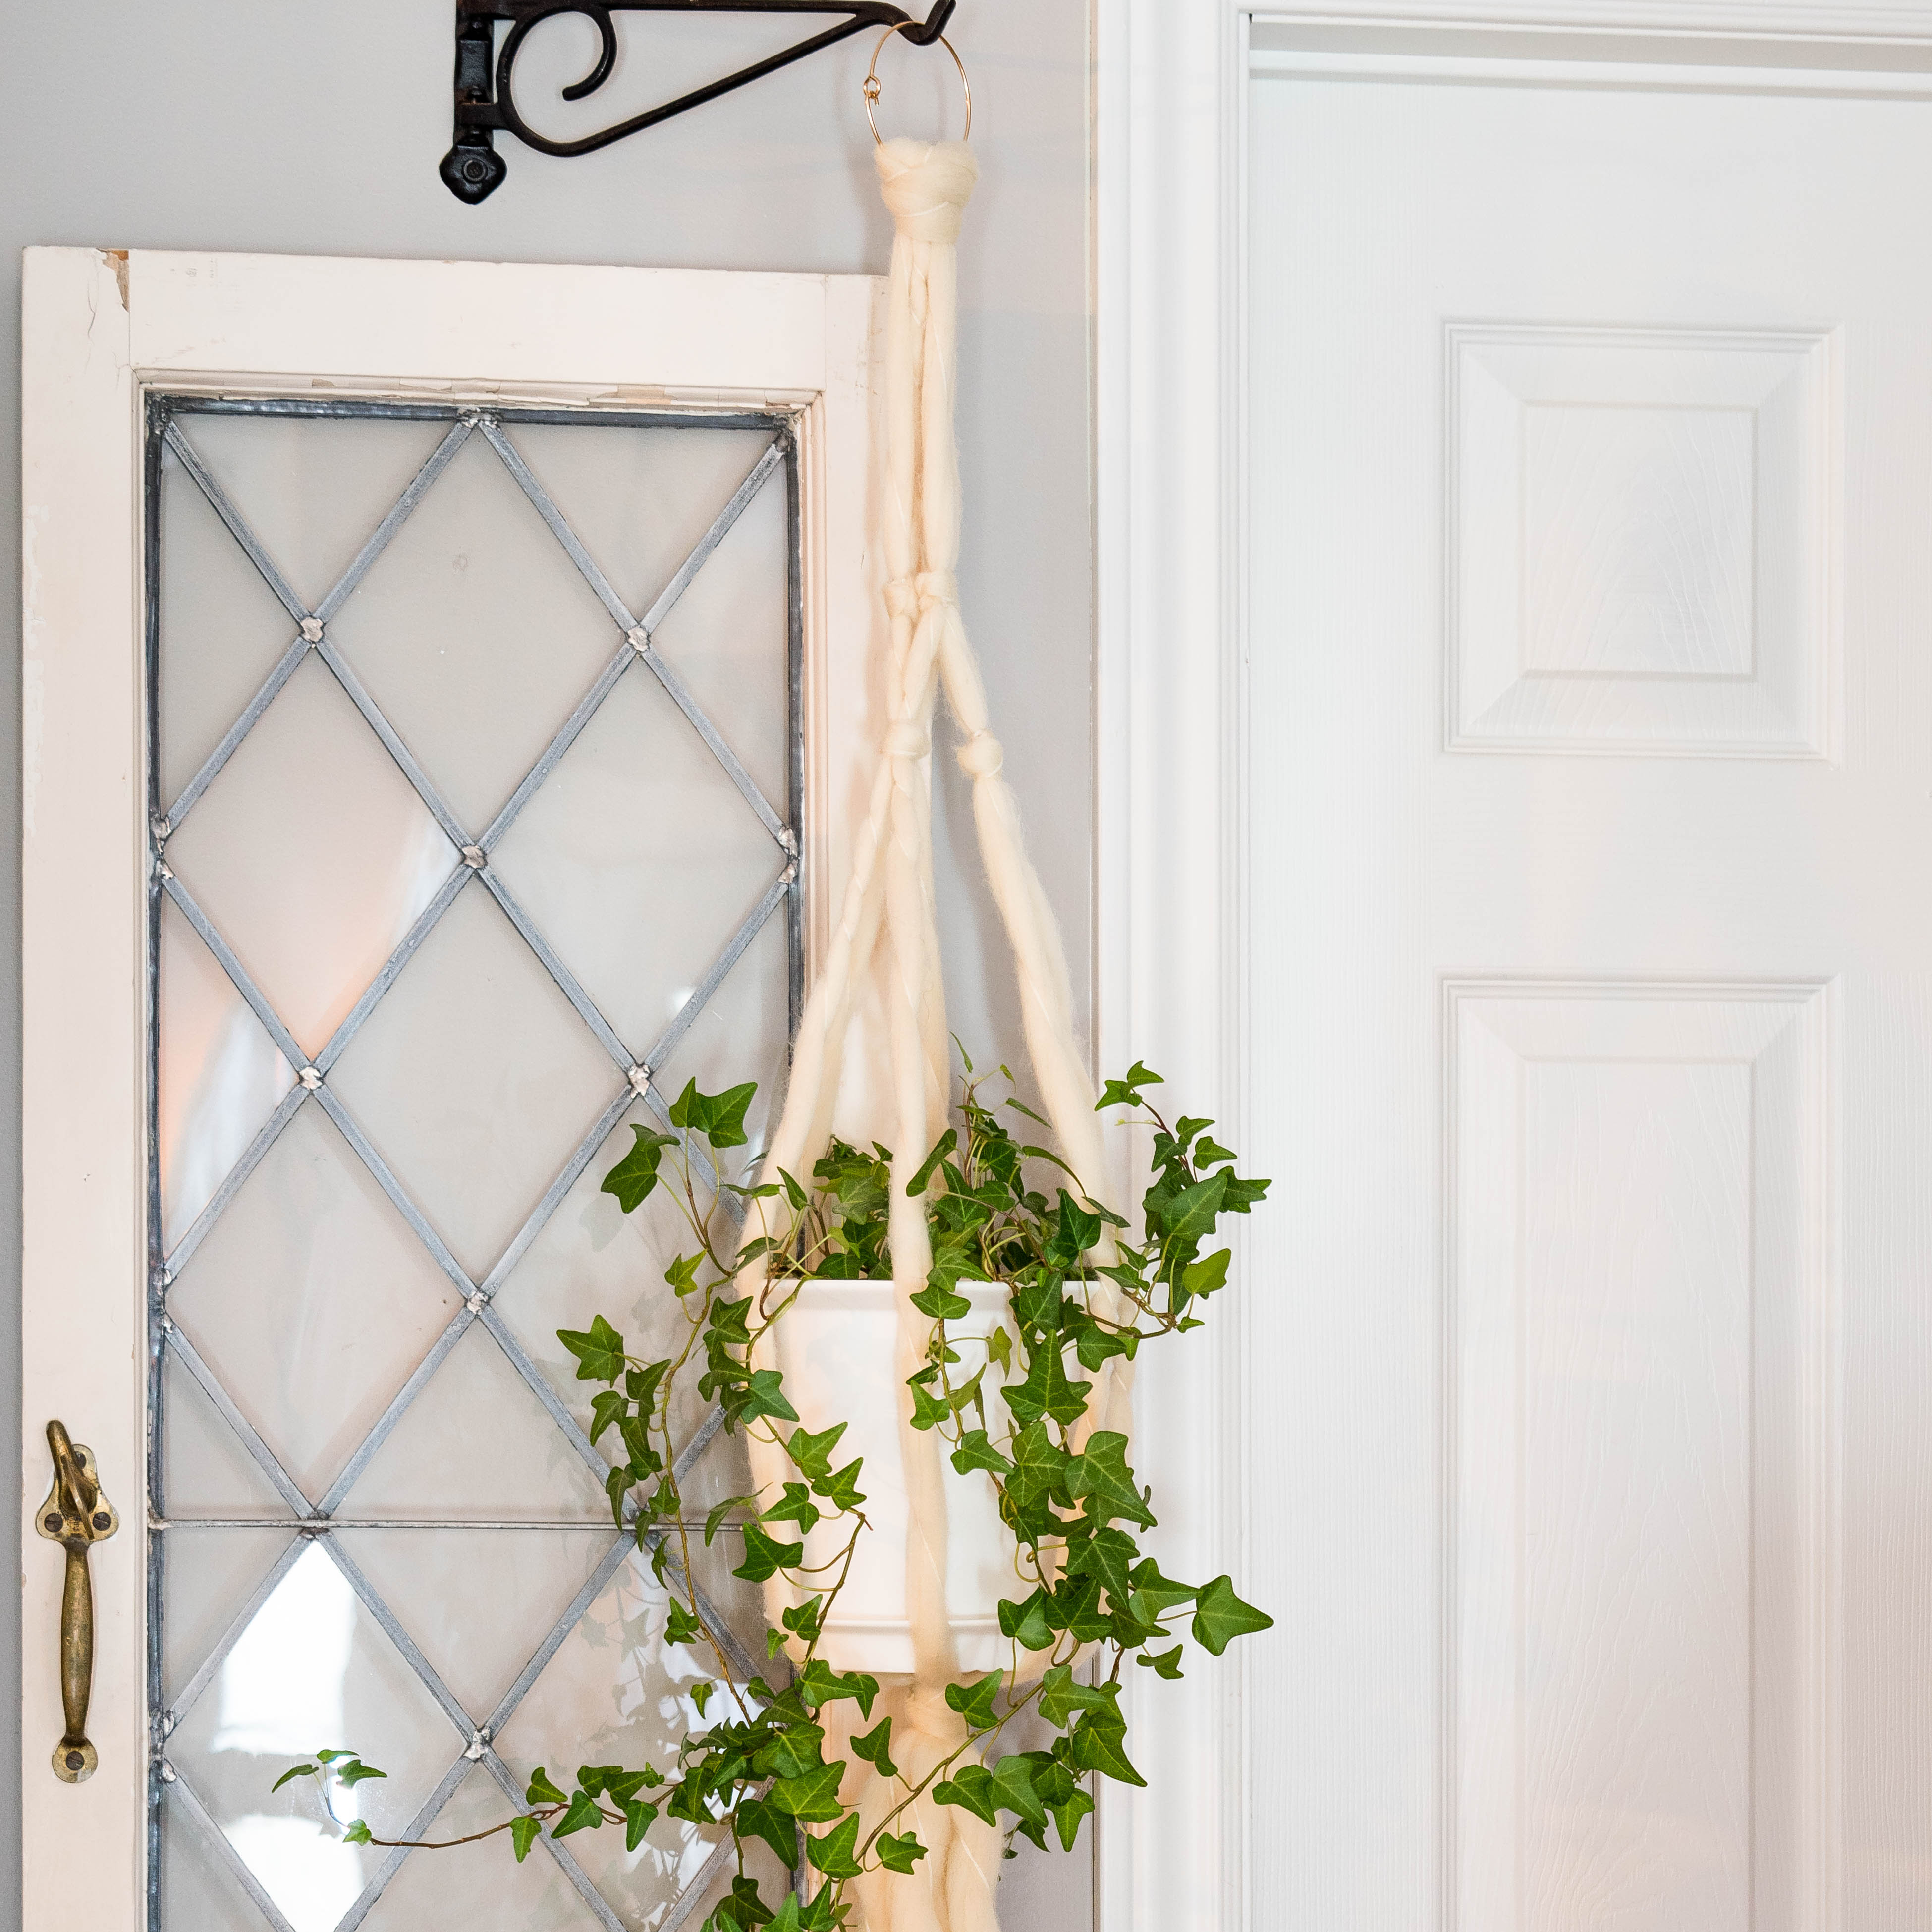
- Favourite pot for the plant of our choice (I bought my pot from Ikea – and used an ivy I already had)
Steps:
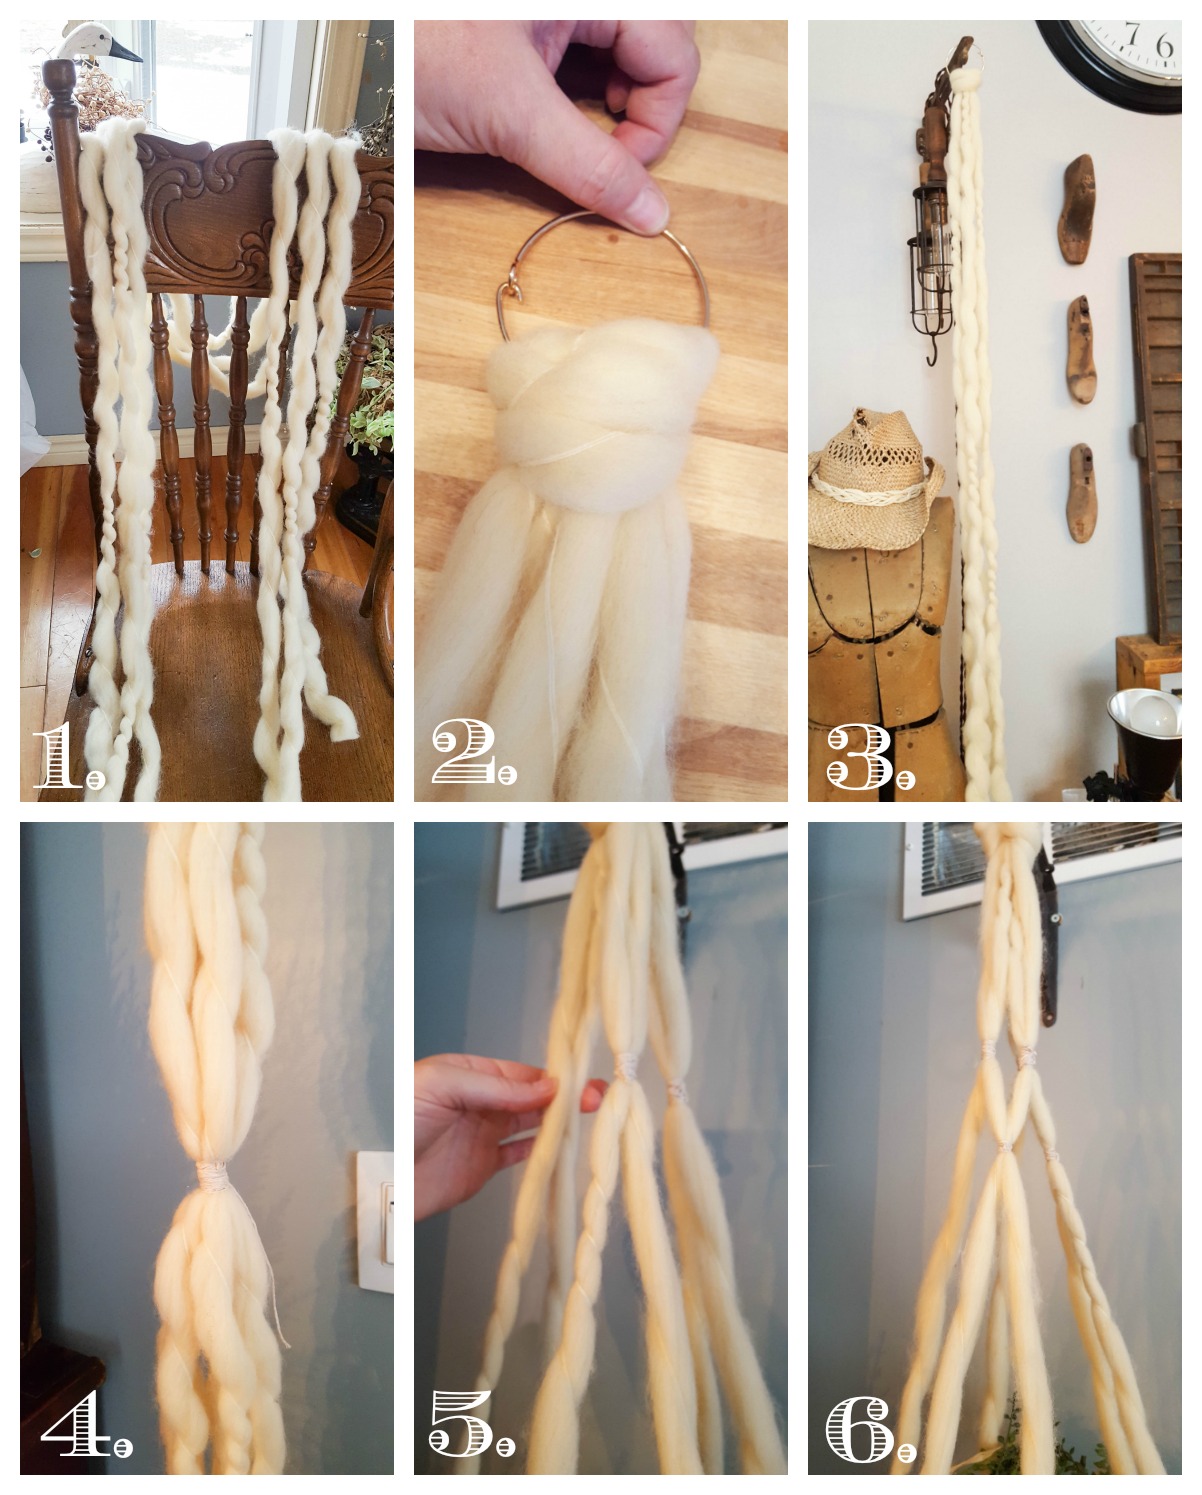
- Measure off 3 long strands of yarn, I used my arms fully extended 3 times (5′-4″ approx) these don’t have to be perfectly even, if you look at the bottom of the finished faux macrame hanger you will notice that they aren’t even… once I had this hanger made I decided I liked the look of it with the tails at different lengths and decided not to trim them even.
- Take your 3 lengths of yarn and grab them all together in the middle, now tie a cow hitch knot through the bangle.
- Hang the bangle with the yarn tied to it from a hanger or off of a hook.
- Guesstimate where your pot will sit in the hanger, use your own judgment, once you know where the pot will sit pinch all of the strands together and tie some twine where you’ve pinched and start tightly wrapping the twine until there is a good bit of it on and around the yarn, this is your bottom.
- Next move up to the top of your faux macrame hanger and pinch 2 strands together and repeat the twine wrapping process, continue until 3 of the strands are tied together – as shown.
- Move down and repeat step 5 but tie the opposite strands together – as shown.
- After the hanger was made I decided I did not like just the twine showing, I decided to tie wool strands over the twine to cover up the string. (process not shown)
 I’m pretty happy with how fast this little project was to make and with how high end it looks… a bit of a modern twist on macrame… no special knot knowledge or knot courses necessary. 😉
That’s it that’s all… so easy if I had more pots I would have made more. I think my next trip to Ikea I will pick up some more of those white pots and make a hanger with multiple levels, if I do I will update this post. 🙂
Thank you for stopping in and following along, I really truly do appreciate it. xo

Now it’s time to see the rest of the DIY YARN project ideas from my Canadian blogging friends.

From the top left, they are:
Crochet Cowl from Brooklyn Berry Designs
DIY Chain Yarn Garland from Woman In Real Life
Easy Arm Knit Reading Blanket from Heather in Heels
Creative DIY Art Using Yarn from Love Create Celebrate
Easy DIY Faux Macrame with Yarn from Vin’yet Etc.
DIY Pom Pom and Tassel Stockings and Tree Skirt from PMQ for Two
Free crochet coaster pattern for beginners from Sustain My Craft Habit
Beginner Crochet Infinity Scarf from Fresh Crush
DIY Yarn Wall Hanging from Lifeovereasy
How to Make an Arm Knit Blanket with a Fringe from The DIY Mommy
Make Embellished Yarn Wrapped Glass Bottle Vases from Time With Thea
Christmas Front Porch from Life Is A Party
Disclaimer: This post is sponsored by, Lion Brand® Yarn Company. As always, all of the opinions here are my very own and I only recommend companies that I love and use myself.

14 Comments
This is so beautiful Laurie! Love this twist on macramé. My mom went through a brief macramé phase when I was young and I’m still wondering where the owl she made ended up.
That owl is so in again… you should totally look for it. 😉 I did not appreciate the macrame when it was an in thing back in the day, my Nanny used to make it all of the time. I love the way some of it looks now and plants! <3 lol I have a small plant fetish!
Looks like it was purchased in the finest of stores! I love how luxe it looks
Thanks Ariel, I love it too!
this is so lovely! so much more high class than the macrame I remember from my childhood. And I love all the green you’ve got in your home – so fresh!
I agree, the macrame I remember was so ewww… I really do love this version much better and no special knot tying skills required, win win! xo
I never appreciated macramé when I was young but NOW, I can’t get enough! And I love your spin on it. Great use for a plush yarn!
Ditto Sonja, just wasn’t my thing when I was young, I just love the way this turned out and that yarn… oh my goodness I want to wrap everything in it, it’s so gorgeous!
Love how this turned out! My mom always had an ivy plant like this one – what a pretty way to display it! Love that you make it seem easy, too.
Ivys are where it’s at! 😉 haha, easy to grow and so pretty! I have a bit of a plant addiction… This was SO easy to make, I love the way it turned out!
Such a pretty project. Love the retro feel. Great job Laurie.
Thanks Dannyelle! xo
I love this!! And it doesn’t seem to difficult! Pinning for later – thanks for sharing this tutorial!
-Clarissa @ The View From Here
It’s SOOOO easy, I almost felt guilty posting a tutorial! 😉